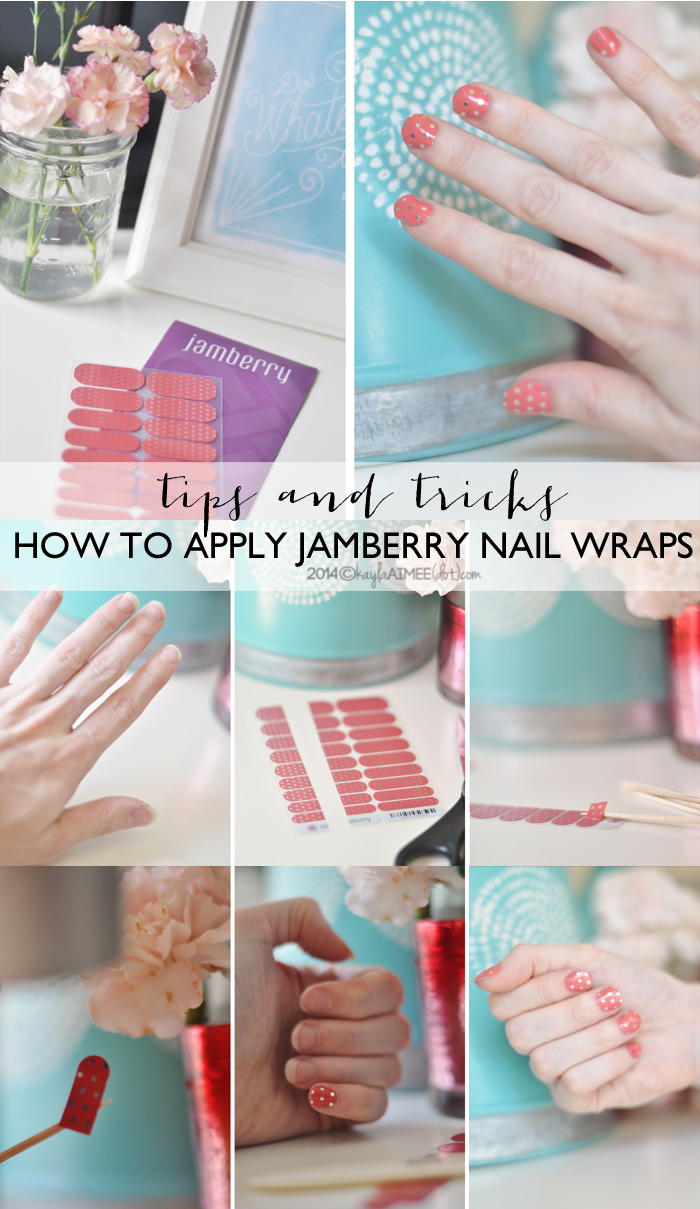
So I don’t actually do my nails, as evidenced by that first picture of my bare hands. My nails grow really fast but also break easily and because I don’t know why, I’m always just ripping them off with my teeth versus acting like a grown up and finding a pair of nail clippers. But a bunch of the moms in my preemie group have been showing off their Jamberry Nail Wraps and I wanted to try it out, kind of like that time in middle school when I wore white knee highs because everyone else did only this is a way better look for me.2
Anyhow, a fellow scrapbooking friend is a consultant so I ordered a set to try from her. Then I attempted to photograph myself in the middle of the process of putting them on my hands. It was much harder than I anticipated. Not applying the nails. Taking pictures of my hands without using my hands. I did not really think that through. So here is the photo process and what I did and didn’t do:
 I’m pretty happy with how they turned out, especially given the state of my hands. I don’t know how nurses do it, the nearly six months we spent in the NICU basically destroyed my hands and nails with all the heavy washing.
The nails come with instructions. I did not wipe my nails with alcohol first because I did not want to dry them out. A few people on youtube told me it was okay to skip that step so I did because it’s a good idea to believe everything you see on the internet. I just scrubbed and dried my nails really well.
I also discovered that since I am mostly anti-manicure, I had no actual manicure tools. Which meant I didn’t have a cuticle stick. So I pushed back my cuticles with a Making Memories rub-on tool from my scrapbooking supply stash. This is why it is a good idea to hoard stuff even if you haven’t made a scrapbook page in exactly one year.
I have short nails so I was able to cut each strip in half, which gave me two full sets for fingers + one set for my toes. So for $15, that was not a bad price. I used a toothpick to hold the nail wrap up while I blasted it with the hair dryer. I found that if I pressed down from the base of the nail to the tip I got the most even coverage without bubbles versus trying to apply it by wrapping from one side to the other.
It was really easy to trim the excess and file it down and then I actually used a Making Memories bone folder to rub all over my nail to get it really smooth before setting it with the blow dryer again.
The whole process took maybe ten minutes. I would recommend doing your toenails first if it is the first time you are trying them out because my second hand looked a lot smoother than the first after I got into a good rhythm. So practice on your toes because then it’s easier to hide any imperfections.
I will most likely wear the next two applications I have left on my toenails and keep my nails bare just because that’s my typical MO but I have an event coming up that I thought it might be fun to try fancy nails for. I like that they are non-toxic and I think they turned out pretty cute, what do you think?
(This post isn’t sponsored or anything, I bought these because I wanted to try them. But Karalyn offered to let me post her sample link and I like to support my friends, so if you want to try them you can order a free sample here to test them out before you buy or you can order them from her here!)


