
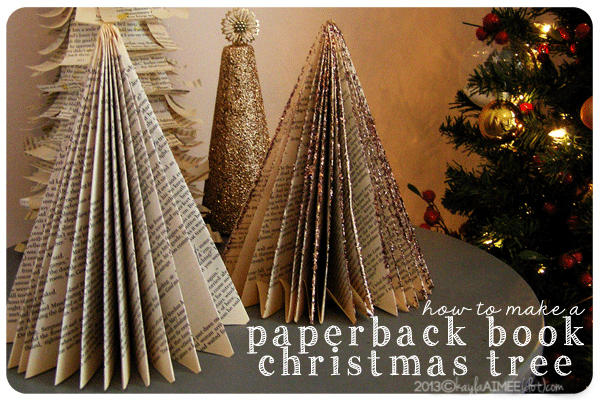

This decorative folded paperback christmas tree made from a paperback book is super cute, easy to make, and affordable. It’s even a great craft to do with your kids, although I recommend letting an adult do the cutting with the exacto knife. That’s how we do it in my house. I mean, we don’t have kids but my husband is a little leery of leaving me alone with sharp objects. I can’t ever imagine why.
(UPDATE: We totally have a kid now but J has still not changed his position on the whole “sharp object” thing)
There are several variations you can make on these trees (like the rolled tree & the full glitter cameo tree in the background) that you can learn to make HERE.
Paperback Book Christmas Tree: Supplies
A paperback book – you can use one you already own or pick up an old holiday themed book at a thrift store!
An exacto knife
Dry adhesive
Optional supplies: glitter and glue (I used Martha Stewart tinsel glitter in brownstone and gold, as well as Martha Stewart glittering glue w/brush applicator. It’s hands down the best glue for applying glitter.)
Paperback Book Christmas Tree Step by Step Tutorial
Step One: Find a paperback book. Oh look, I found a few. That is because I inherited 352580551 paperback books of my grandmothers and they are currently multiplying themselves around my house.

Step Two: Gently remove the cover so that it is naked. I hope your book is not modest. Mine did some nude modeling back in art school.

Step Three: Count out 30 pages of your book. This is where page numbers come in handy.

Step Four: Use an exacto knife to slice down the spine where you’ve partitioned off your thirty pages. Don’t worry, the book won’t feel a thing.

Step Five: Repeat steps three and four. You should have two sets of thirty pages that look like this:

Step Six: Now take one section of the book and lie it on the table so that the spine is facing left, as shown. Grasp the top right corner and fold it down so that the edge of the corner is touching the spine.

Step Seven: Now grasp the part of the page where the folded edge meets the straight edge. Fold it over so that the part of the page that it already folded from the last step will be flush with the spine. It’s just like folding a paper airplane.

Step Eight: either fold the overhanging part of the page up, or cut it off. I prefer to cut mine. It will sit well either way.

Step Nine: Continue to do this until all of the pages are folded.


Step Ten: Take the other set of thirty pages and flip it so that the spine is on the right. Repeat steps six through eight.

Step Eleven(OPTIONAL): Now hold the book page with the folded part towards you and brush glue along the edges. Then dip the edges into glitter and shake off the excess.


Note: when you use the glitter, you’ll have to gently seperate the page edges afterwards so that the glue doesn’t adhere the pages together.
Step Twelve: Lay the folded pages down and apply dry adhesive liberally to the front and last page

Step Thirteen: Press the two edges of each set together, lining up the edges. Open the pages and curl around until you can do the same both sides.

Step Fourteen: Sit it up and let dry! Occasionally you’ll need to add some glue to the very top of the tree, along the inside edge to keep it from gapping but if you use enough dry adhesive that shouldn’t be a problem! Sit back and enjoy all the compliments you get on your awesome tree.

(Other Christmas Tutorials & Freebies: 12 Fun Free Christmas Fonts | Love You Latte Gift In A Bag | No-Sew Tutu | DIY Photo Color-A-Magnet | Printable Calendar Sticker Magnets | or see all of my DIY Christmas projects HERE


YES! SEND ME SOME CHRISTMAS CHEER!
Like this tutorial? Feel free to Pin It 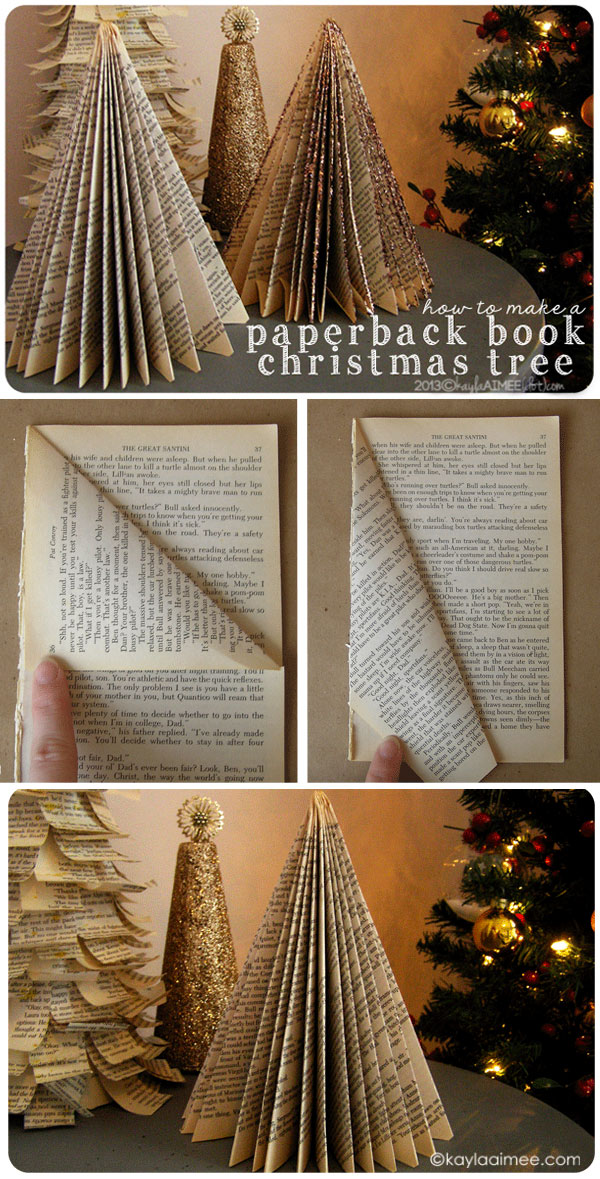


